Welcome to GL Interior
Green Living Interiör

Anything you need in reupholstery
- 076-127 66 24
- info@glinterior.se
Webbing upholstery, replace straps on a Bruno Mathsson armchair
Time required: approx 2-5 hours
Difficulty: easy
In this article, I describe how to easily and quickly put a new webbing on a worn Eva armchair. The method described below can of course be used just as well when you replace webbing on other types of chairs or furnitures.
If you own an older armchair with webbing, you know for sure that over time the seat will wear out, it will become frayed and if you have had the armchair for a long time, even the webbing can come off or break. But relax, it's both quick and relatively easy to replace the seat webbing and your armchair will look as new again.
What should you choose for the material in the webbing that you are planning to replace the seat with? there are some to choose from, hemp, jute, elastrong (synthetic) to name a few. Of course you can choose one of these, the price is also cheap. If, on the other hand, you want a durable seat that also gives an aesthetic impression, you should choose a webbing made of linen. There are a number of colors to choose from but the common ones are natural, pale or black. In our case when we replace the webbing on our Bruno Mathsson armchair, we choose a webbing, original from Bruno Mathsson. It should now be mentioned that the original seat in black from Bruno Mathsson is made of synthetic material. The original webbing from Bruno Mathsson has a high price and if you want you can buy considerably cheaper once with equivalent quality and the look will also be good.
Step 1 Disassemble and remove previous webbing.
Start by unscrewing the armchair, starting with the two armrests, 5 screws on each side. Then remove the base which is fixed with 4 screws underneath the chair. Then remove the old straps (possibly fabric).
Tip: Start by cutting off the seat belt, then use a pair of pliers and bend off the strap together with the staples that attach it.
Step 2 Clean or possibly sand and varnish.
In general, it should be said that the vast majority of armchairs from Bruno Mathsson's collection that you find on the second-hand market are of a high standard. It is rare that the frame has cracked or that the armchair needs to be repainted. It is also only the outer edges of the frame that are painted, which ease the work, it also does not matter if the frame has a couple of marks as these will be covered by the new webbing. If the case is that you want to revarnish the frame, we suggest that you sand away the old varnish and apply it in a couple of thin layers of transparent varnish with a lower gloss content. But usually a little water and soap are enough to get rid of the dirt coating that is usually seen on the frame.
Step 3. Attach the webbing onto the frame
- It takes about 18 m of webbing for an Eva armchair and the simplest method is to cut the lengths in advance according to the cut list below.
12 pcs 0,70 meter
6 pcs 1,20 meter
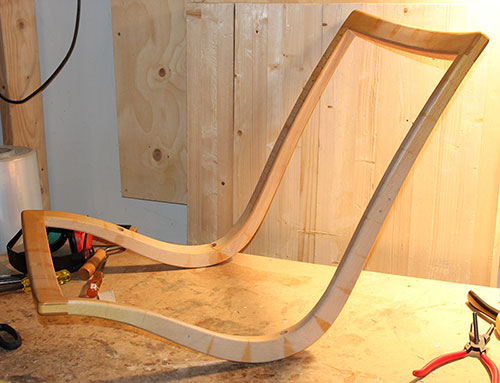
- The next step will be to set a distance between the frame to prevent the frame from sagging when you tighten the strap. The best way is if you use a longer clamp, but it also works well if you measure and cut a thicker piece of wood to the right length. To get the correct distance, compare the distance between the screw holes of the base and the holes in the frame. Pull off a few mm so that the seat belt stays tight when you mount the chassis.
Important
: Make sure that the distance you place between the frames is neither too long nor too short. If you tighten the frame too much, the seat
strap will become slack when you mount the armchairs base, but if it is too short and you tighten the seat belt, you will
instead have problems mounting the base.


- Mount the first piece of webbing in the frame curve. Measure from one side how far in the strap has to be mounted to make sure all straps can be mounted with equal distance. Attach the strap with 5 staples in a symmetrical pattern, fold the strap double before mounting it. The length of the staples has to be atleast 12 mm in length, otherwise the strap will not be fastened enough. Pull then over the strap to the other frame edge and tighten securely. To get the best tension, pull over the strap with a flat tool when tensioning, this will tighten the webbing even further. Temporarily attach the webbing to the edge with 3 staples, attach them loosely you will remove them later after assembly. Pull around the webbing and fasten it on the inside, you will need to cut to the piece for good and nice mounting.
- Now that the first piece is fixed, you can measure the distance where the other pieces are to be attached. Use the piece that you just cut off from when you attached the first strap, use a pencil and mark with small strokes where each webbing should be placed. Note, the distance between the strap in the curve should be wider otherwise the strap will overlap each other. Try to position the strap so that the distance between the pieces during assembly becomes as equal as possible. A small deviation will however not be visible in the end result. Then mount all straps in the same way as you mounted the first piece.


- Although it is now possible to mount the base, it is preferable to braid the longitudinal pieces and attach them to the bottom edge as it is easier to access with the stapler. Braid the armchair in a chess pattern, it does not matter in which order you start. In total, there should be 6 longitudinal straps. Save a piece at the bottom edge that you fold around the wooden frame and mount on the inside. These pieces can be a little more tricky to attach, but since they are not visible, it is good to attach them in a row with a 45% slope.


Step 4 Chair Assembly
- Assemble the base, make holes for the 4 screw holes. These holes can be difficult to locate, but with the help of a sharper object such as a screwdriver, you can usually feel where the holes are located. To facilitate the search, the screw holes are placed under strap 3 and strap 7, respectively, counted from the front edge. Sometimes it can be difficult to mount the chassis as the distance between the frames is too small, in general it is usually possible to tighten the frame with a couple of clamps to facilitate installation.


- When the chassis is mounted, you can attach the upper straps. It is enough to tighten these by hand, so you do not need to use the webbing tensioner.
Note The webbing has a tendency to stretch over time, which means that the seat will "sag" over time, so it does not matter if you tighten the webbing a little extra as this will help the sagginess .
Finally, just mount the 2 armrests with the 10 screws. Note that two of the screws are generally shorter and the others, these two screws should be mounted at the far end of the lower armrests.
It might be alot of unclearity in the descriptions obove and if there are any questions or concerns, please feel free to contact us
Tools: Webbing tensioner, stapler, pliers, scissor, screwdriver, clamp, staple remover.


