Welcome to GL Interior
Green Living Interiör

Anything you need in reupholstery
- 076-127 66 24
- info@glinterior.se
How to weave a chair with Danish Cord
Time required: approx. 2-4 hours / chair
Difficulty: medium
We can see many classic Danish chairs and armchairs braided with paper string, just to name a few; Mogensens J-39 Folkestolen, Öresund chair (seagrass), Hans Wegners CH-24 Y-chair, CH-23, CH-25, CH-36 and more. Even if danish cord is a durable material, it can stain and the braiding can become ugly over time. Then its good to know you can get your chairs like new again and if you want to do it yourself, we will shoe you how and also try to describe the procedure here.
The technique and the approach on how to weave chairs are is basically the same. Sure, some are easier to lace than others and it takes a little practice to get a good result. The time it takes to braid a chair also varies greatly depending on which chair / armchair it is, of course you will braid much faster with time after you have received some practise.
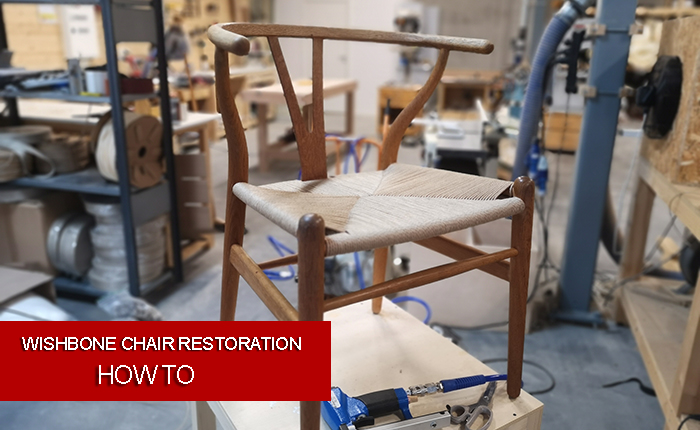
I this article we will weave a Mogensen J-39 chair, but if you are on your way to weave something similar, like for example a wishbone chair the approach is basically the same.
So, let get started
1. Equipment/tools
The equipment and tools needed to braid a chair are minimal and most of you already have these tools at home. The basic tools needed are: Scissors / cutting pliers, staple gun (model simple) and some clamps, it is also preferable that you use a pair of gloves as braiding can be a bit harsh on your hands. This is all it takes.
In addition to the above-mentioned tools, you need of course danish cord, it takes about 140 m of cord for a chair J-39. (same applies to the wishbone chair)
2. Chair pattern and what is important to achieve a good end result
The J-39 chair has a cross-shaped (envelope) seating pattern, which means that the braiding ends in the center of the chair. This is not how all chairs looks like and a good trick for understanding how the braiing is done is that you closly observe the pettern when you remove the excisting braiding, carefully study how these are made. But before you start braiding, it is important to understand how and where you start, otherwise it can end up very odd towards the end. The important thing regardless of chair is that the front distance must be as large as the rear, the same applies to both sides. However, it does not have to be the same distance front and rear as it is on the sides as it is on the Y-chair, for example. Below I have tried to describe in a picture what I mean. In order for it to be correct on, for example, a J-39 chair, a number of turns must be wrapped around the crossbar on both sides of the front od the chair. As a result, the distance will be the same both front and rear.
The other very important part for getting a good result is that you tighten the rope hard and evenly around the entire braid. As a result, you will get an even and good result.


3. Start Weaving
Now we can start, cut an approximately 1 meter long "stump" and fasten one end of the danish cord to the outer part of the front wooden frame with staples. Then wrap 9 turns and fasten the rope again with staples. Do the same on the other side. See picture above.
3.1 Two methods
As you have probably figured out by now, you can not cut a 140 meter long cord which you then start braiding with, there would be a lot of paper rope to keep track of and it would get tangled very easily. There are two methods that you can use and if you are new to braiding I would recommend the first method although the second with training will go faster. The first method is to wrap the paper string on a holder, similar to the one in the picture below. You can then wrap quite a lot of rope at once and it will be easier to keep track of the cord during weaving. The second method is to cut about 16 meters of rope (8 arm lengths) and braid with this entire length without using any holder. Like I show you on our video.
Whatever you choose, you will have to join the string from time to time, but do not worry, the joining is durable and most of them you will be able to hide and will not be visible on the finished chair.

4. Weaving
The next step is to attach the string to the front frame, this is easiest done with some form of knot, a simple one will do. Then it's just to start braiding, I now assume that you use method one, the rope wrapped up on a holder. You can then braid a turn around the chair before you start tightening the string. Start by moving the rope over the rear frame then around and under. Bring the rope up in the middle of the chair, cross the string you previously laid and around the left frame and up. Move the cord to the opposite side (right side), wrap over this frame and around. Do as previously, up and then around the rear frame. Continue in the same way around the whole chair, you can than put away the holder.
Now that you're done with the first lap, it's going to look similar to the pictures below.
Now for the actual tensioning, work methodically around the frame of the chair and tighten the string tightly, the important thing to keep in mind is that you tighten the rope evenly around the chair. When you have reached the end of the first round, attach the rope to the edge with the clamp to hold the cord in place. Now take the holder with the rope again and wrap it around the chair as previously, for the second round. Remove the clamp while simultaneously tightening the string. Again, tighten the cord around the chair and fasten it with the clamp at the end of the second lap.
Continue like this until the cord is finished and it's time to join on a new string. Important note, when you braid it is important that you on every corner try to get as nice a transition as possible when you cross the previously laid string. You can gently adjust previously laid ropes with a blunt screwdriver or similar if you notice that some of the strings protrude too much. If you dont keep this in mind you will unfortunetely end up with a bad braiding.
Tip! It can be a good idea to occasionally compress all cords that is wrapped around the frame to keep the inner hole as square as possible (for the Y-chair, the hole will be rectangular).


5. Splicing of Danish Cord
Every now and then you have to join the cord, this is easily done with a regular knot. In order for the knot to be unvisible on the finished chair, place the knot as close to the center as possible between the front and rear frames. See picture. Towards the end of braiding, it will be difficult to completely hide all the knots, then you can place these under previous braids, underneath the chair.

6. Completion
Gradually you will notice that it is no longer possible to use string hung on a holder, after which you have to start braiding with whole cord (about 16m is appropriate). However, the procedure will be the same however you will have more ropes to work with. If everything is done correctly, all four corners should be centered towards the center (this applies to the J-39 chair, for the Y-chair the braid will merge into a winding between the front and rear frame) and there should be no gap when you wind around the frame .
Tip! Towards the end of the braiding, you will notice that it will be quite difficult to get the cord through the braiding in the middle. What you can do then is take a screwdriver and widen the hold a little, then you will be able to pass through the string.
You will finish the weaving by attaching the string to the bottom edge by tying the end together with the previously wrapped cord.
I now hope that you have received a description of how you can easily braid your own chair. As mentioned earlier, it takes a little practice before you get a really good result and your first chair can feel like an eternity of work. You will quickly come to terms with the difficulties and you will also be able to increase your speed significantly over time.


